LNMP 部署
1. 关闭防火墙。
- 运行以下命令,查看当前防火墙的状态。
systemctl status firewalld- 关闭防火墙。
- 临时关闭防火墙:
sudo systemctl stop firewalld说明:临时关闭防火墙后,如果 Linux实例 重启,则防火墙将会 自动开启。
- 永久关闭防火墙:
- 关闭防火墙。
sudo systemctl stop firewalld- 实例开机时,禁止启动防火墙服务。
sudo systemctl disable firewalld说明:如果想重新开启防火墙,请参见 firewalld官网信息。
- 关闭 SELinux。
- 运行以下命令,查看 SELinux 的当前状态。
getenforce- 如果 SELinux 状态参数是
Disabled,则 SELinux 为关闭状态,请执行步骤二:安装Nginx。 - 如果 SELinux 状态参数是
Enforcing,则 SELinux 为开启状态,请执行步骤2.b。
- 关闭 SELinux。
SELinux 关闭的方式分为 临时关闭 和 永久关闭,请您根据自身业务需求进行选择。具体操作,请参见开启或关闭SELinux。
- 临时关闭:
setenforce 0, 并且查看临时关闭状态:getenforce
- 永久关闭
通过修改文件:
sed -i 's#SELINUX=enforcing#SELINUX=disabled#g' /etc/selinux/config将SELINUX=enforcing替换为SELINUX=disabled,这个过程需要重新启动操作系统。
2. 安装 Nginx
yum(Yellowdog Updater, Modified) 是一个开源的命令行软件包管理器,适用于基于 RPM(Red Hat Package Manager)的 Linux 发行版,如 CentOS、Red Hat Enterprise Linux (RHEL) 和 Fedora。它被用于自动化安装、更新、删除和管理软件包。yum 依赖于远程仓库来检索软件包和其依赖项,从而简化了软件包管理的过程。 yum 命令,Linux yum 命令详解:基于RPM的软件包管理器 – Linux 命令搜索引擎
- 运行以下命令,安装 Nginx。
sudo yum -y install nginx- 运行以下命令,查看Nginx版本。
nginx -v返回结果类似如下所示,表示Nginx安装成功。
nginx version: nginx/1.20.1查看Nginx版本
3. 安装并配置MySQL
a. 安装MySQL
运行以下命令,更新YUM源。
sudo rpm -Uvh https://dev.mysql.com/get/mysql80-community-release-el7-11.noarch.rpm运行以下命令,下载软件包索引信息。
yum makecache运行以下命令,安装MySQL。
sudo yum -y install mysql-community-server运行以下命令,查看MySQL版本号。
mysql -V结果显示:
需要登录才能显示版本号:
正常应该如下所示
查找原因如下(懒得搞了):
运行以下命令,启动MySQL。
sudo systemctl start mysqld依次运行以下命令,设置开机启动MySQL。
sudo systemctl enable mysqld
sudo systemctl daemon-reload
b. 配置MySQL
- 运行以下命令,查看
/var/log/mysqld.log文件,获取并记录root用户的初始密码。
sudo grep 'temporary password' /var/log/mysqld.log命令行返回结果如下,其中oArSn*ogy4A4 为MySQL的初始密码。在下一步重置 root 用户密码时,会使用该初始密码。
2024-07-23T06:11:15.027644Z 6 [Note] [MY-010454] [Server] A temporary password is generated for root@localhost: oArSn*ogy4A4 - 运行以下命令,配置MySQL的安全性。
sudo mysql_secure_installation- 输入 MySQL 的初始密码。
说明:在输入密码时,系统为了最大限度地保证数据安全,命令行将不做任何回显。只需要输入正确的密码信息,然后按 Enter 键即可。
Securing the MySQL server deployment.

Enter password for user root: #输入上一步获取的root用户初始密码- 设置 MySQL 的新密码。(Zhou1010..)
The existing password for the user account root has expired. Please set a new password.

New password: #输入新密码。长度为8至30个字符,必须同时包含大小写英文字母、数字和特殊符号。特殊符号包含()` ~!@#$%^&*-+=|{}[]:;‘<>,.?/

Re-enter new password: #确认新密码。
The 'validate_password' plugin is installed on the server.
The subsequent steps will run with the existing configuration
of the plugin.
Using existing password for root.

Estimated strength of the password: 100 #返回结果包含您设置的密码强度。
Change the password for root ? (Press y|Y for Yes, any other key for No) :Y #您需要输入Y以确认使用新密码。

#新密码设置完成后,需要再次验证新密码。
New password:#再次输入新密码。

Re-enter new password:#再次确认新密码。

Estimated strength of the password: 100
Do you wish to continue with the password provided?(Press y|Y for Yes, any other key for No) :Y #您需要输入Y,再次确认使用新密码。- 输入 Y 删除匿名用户。
Remove anonymous users? (Press y|Y for Yes, any other key for No) :Y
Success.- 输入 Y 禁止使用root用户远程登录MySQL。
Disallow root login remotely? (Press y|Y for Yes, any other key for No) :Y
Success.- 输入 Y 删除 test 库以及用户对 test 库的访问权限。
Remove test database and access to it? (Press y|Y for Yes, any other key for No) :Y
 - Dropping test database...
Success.

 - Removing privileges on test database...
Success.- 输入 Y 重新加载授权表。
Reload privilege tables now? (Press y|Y for Yes, any other key for No) :Y
Success.

All done!
4. 安装并配置PHP
检查一下,系统当中是否含有旧版本的PHP,如果有,将其卸载,避免旧的组件和新版本冲突
以上结果显示,系统中没有PHP存在
a. 安装PHP
更新 YUM 源。
- 运行以下命令,安装EPEL源和Remi仓库。
sudo yum install -y epel-release
sudo rpm -Uvh https://mirrors.aliyun.com/remi/enterprise/remi-release-7.rpm- 运行以下命令,启用PHP 8.3仓库。
sudo yum-config-manager --enable remi-php83运行以下命令,安装PHP。
sudo yum install -y php php-cli php-fpm php-mysqlnd php-zip php-devel php-gd php-mcrypt php-mbstring php-curl php-xml php-pear php-bcmath php-json运行以下命令,查看PHP版本。
php -v返回结果类似如下所示,表示安装成功。
b. 修改 Nginx 配置文件以支持PHP
- 运行以下命令,备份Nginx配置文件。
sudo cp /etc/nginx/nginx.conf /etc/nginx/nginx.conf.bak- 修改 Nginx 配置文件,添加 Nginx 对 PHP 的支持。
重要:若不添加此配置信息,后续使用浏览器访问 PHP 页面时,页面将无法显示。
- 运行以下命令,打开 Nginx 配置文件。
sudo vim /etc/nginx/nginx.conf- 按
i进入编辑模式。 - 在
server大括号内,修改或添加下列配置信息。
除下面提及的需要添加或修改的配置信息外,其他配置保持默认值即可。
- 添加或修改
location /配置信息。
location / {
            index index.php index.html index.htm;
}- 添加或修改
location ~ .php$配置信息。
#添加下列信息,配置Nginx通过fastcgi方式处理您的PHP请求。
        location ~ .php$ {
            root /usr/share/nginx/html;    #将/usr/share/nginx/html替换为您的网站根目录,本文使用/usr/share/nginx/html作为网站根目录。
            fastcgi_pass 127.0.0.1:9000;   #Nginx通过本机的9000端口将PHP请求转发给PHP-FPM进行处理。
            fastcgi_index index.php;
            fastcgi_param  SCRIPT_FILENAME  $document_root$fastcgi_script_name;
            include fastcgi_params;   #Nginx调用fastcgi接口处理PHP请求。
        }
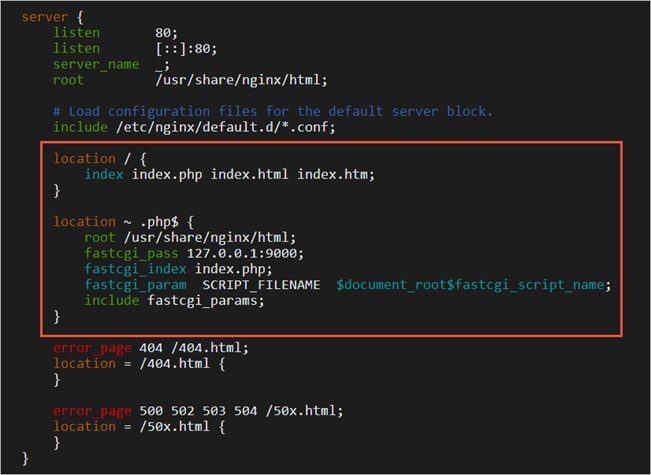
添加或修改配置信息后,文件内容如下图所示:
- 按
Esc键,输入:wq,按Enter键关闭并保存配置文件。 - 运行以下命令,启动Nginx服务。
sudo systemctl start nginx- 运行以下命令,设置Nginx服务开机自启动。
sudo systemctl enable nginxc. 配置PHP
- 新建并编辑
phpinfo.php文件,用于展示 PHP 信息。 - 运行以下命令,新建
phpinfo.php文件。
sudo vim <网站根目录>/phpinfo.php<网站根目录>是您在nginx.conf配置文件中location ~ .php$大括号内,配置的root参数值,如下图所示。
本文配置的网站根目录为/usr/share/nginx/html,因此需要运行以下命令新建phpinfo.php文件:
sudo vim /usr/share/nginx/html/phpinfo.php- 按
i进入编辑模式。 - 输入下列内容,函数
phpinfo()会展示PHP的所有配置信息。
<?php echo phpinfo(); ?>- 按
Esc键后,输入:wq并回车,保存关闭配置文件。 - 运行以下命令,启动PHP-FPM。
sudo systemctl start php-fpm- 运行以下命令,设置PHP-FPM开机自启动。
sudo systemctl enable php-fpm查看PHP:9000端口:
netstat -lntup|grep php-fpm可以看到开机自启动已经创建,默认9000端口已经开放
d. 测试访问 LNMP 配置信息页面
- 在浏览器的地址栏输入
http://<ECS实例公网IP地址>/phpinfo.php进行访问。
访问结果如下图所示,表示LNMP环境部署成功。
5. 后续步骤
测试访问LNMP配置信息页面后,建议您运行以下命令将phpinfo.php文件删除,消除数据泄露风险。
sudo rm -rf <网站根目录>/phpinfo.php其中,<网站根目录>需要替换为您在nginx.conf中配置的网站根目录。
本文配置的网站根目录为/usr/share/nginx/html,因此需要运行以下命令:
sudo rm -rf /usr/share/nginx/html/phpinfo.php安装 WordPress
1. 下载 WordPress
下载最新版本的 WordPress 并解压到 web 根目录中: /usr/share/nginx/html:
cd /tmp
curl -O https://wordpress.org/latest.tar.gz
tar -zxvf latest.tar.gz
sudo mv wordpress /usr/share/nginx/html/
sudo chown -R nginx:nginx /usr/share/nginx/html/wordpress
2. 创建数据库
为 WordPress 创建一个数据库和用户:
sudo mysql -u root -p在 MySQL 命令行中执行以下命令:
CREATE DATABASE wordpress;
CREATE USER 'wordpressuser'@'localhost' IDENTIFIED BY 'Zhou1010..';
GRANT ALL PRIVILEGES ON wordpress.* TO 'wordpressuser'@'localhost';
FLUSH PRIVILEGES;
EXIT;
a. 配置 WordPress
复制 WordPress 配置文件模板并编辑:
cd /usr/share/nginx/html/wordpress
cp wp-config-sample.php wp-config.php
sudo nano wp-config.php
编辑以下内容以匹配创建的数据库信息:
define('DB_NAME', 'wordpress');
define('DB_USER', 'wordpressuser');
define('DB_PASSWORD', 'Zhou1010..');
define('DB_HOST', 'localhost');
3. 配置 Nginx
创建一个新的 Nginx 服务器块配置文件:
sudo vi /etc/nginx/conf.d/wordpress.conf添加以下内容:
server {
    listen 80;
    server_name your_domain_or_IP;
    root /usr/share/nginx/html/wordpress;
    index index.php index.html index.htm;

    location / {
        try_files $uri $uri/ /index.php?$args;
    }

    location ~ \.php$ {
        include fastcgi_params;
        fastcgi_pass 127.0.0.1:9000;
        fastcgi_param SCRIPT_FILENAME $document_root$fastcgi_script_name;
    }

    location ~* \.(js|css|png|jpg|jpeg|gif|ico|svg|woff|woff2|ttf|eot)$ {
        expires max;
        log_not_found off;
    }
}
测试 Nginx 配置并重启 Nginx:
sudo nginx -t
sudo systemctl restart nginx
4. 访问 WordPress 安装向导
在浏览器中访问你的域名或 IP 地址,例如:
http://your_domain_or_IP然后按照屏幕上的指示完成 WordPress 的安装过程。
5. 安全设置
为了更好地保护 WordPress 网站,可以进行一些基本的安全设置:
a. 更改文件和目录权限:
sudo find /usr/share/nginx/html/wordpress/ -type d -exec chmod 755 {} \;
sudo find /usr/share/nginx/html/wordpress/ -type f -exec chmod 644 {} \;
b. 设置防火墙规则:
sudo firewall-cmd --permanent --add-service=http
sudo firewall-cmd --permanent --add-service=https
sudo firewall-cmd --reload
c. 完成MySQL安全配置:
sudo mysql_secure_installation
Leave a Reply